Vulcanusmon (Time Stranger)
| Vulcanusmon | |
|---|---|

| |
| Original Name | ウルカヌスモン |
| Dub Name | Vulcanusmon |
| Title | Leader of the Factorial Area (ファクトリアル・エリアの長) |
| Organization | Factorial Area Olympos XII |
| Voice Actor |  Miyazaki Hiromu (宮崎 寛務) Miyazaki Hiromu (宮崎 寛務)
|
Vulcanusmon is the first leader of the Factorial Area and one of the Apostles of Iliad in Digimon Story: Time Stranger.
Evolution[edit]
| Baby I | ? |
| Baby II | ? |
| Child | ? |
| Adult | ? |
| Perfect | ? |
| Ultimate | Vulcanusmon |
Profile[edit]
Appearances[edit]
Anime[edit]
Digimon Story: Time Stranger Prelude[edit]

Video Games[edit]
Digimon Story: Time Stranger[edit]
Vulcanusmon is the ruler of the Factorial Area of Iliad. He is a talented and eccentric smith who is obsessed with action figures from the human world.
Vulcanusmon first encounters Yuki Dan/Yuki Kanan, Misono Inori and Aegiomon at the depths of the Factorial Area after they repel the Titan invasion that occurred there. He mistakes them for being Titans and attacks them with the Divine Arms Ω.
Vulcanusmon in the Divine Arms Ω serves as the final boss of "Incoming Conflict". Initially, only its Left Arm and Right Arm can be targetted. After defeating the arms, Aegiomon asks Vulcanusmon to come out but Vulcanusmon instead calls two more copies of each Arm. After defeating those Arms, Vulcanusmon's hatch opens and he becomes targetable, and his defense is boosted by two stages for a single turn. This buff cannot be removed by skill effects. If Vulcanusmon's break gauge is emptied before three turns pass, he'll call either two Arms or four arms based on how much turns had past and shut his hatch again. The arms are heavily weakened whenever this happens. If the party fails to break his gauge, he will call four Arms with the opposite alignment of what was on the field when his patch is open with Data-type arms being prioritized, at full strength and resisting the moves that the party's Digimon has.
- The Left Arm(s) are Virus-type. It can deal damage to the entire party with Punch and Sweeping Slash, or damage to one Digimon with Chop. During the second phase, one of the Left Arms can also guard.
- The Right Arm(s) are Vaccine-type. It can deal damage and Confusion to the entire party with Pummel, damage to one Digimon with Punch, and apply the Taunt status to itself with Taunt.
- During the first phase, if both Arms are alive and Vulcanusmon's CP meter reaches 3, they can perform Grand Shake. If one of them is KOed, the move will fail upon activation. It will instead perform Machine Gun Punch, a multi-hit move that is significantly stronger compared to Grand Shake and can activate even if one or two of the arms are down (although the move will be weaker if this happens).
- Vulcanusmon himself can power up the Arms, giving them a Speed buff with Plan! Execute! Evaluate! Improve!, an Attack buff with Intercept Plan A Initiated!, and an Int buff with Intercept Plan B Initiated!
Both Arms are neutral to all elements and have the "Medium" and "Machine" genes. The main body is weak to Earth and Null, resistant to Fire and immune to Metal (same as playable version) and has the "Olympos XII", "Deity" and "Human" genes.
In the Super Ultimate difficulty, the Right Arm(s) can use Thruster Metal III and Vulcanusmon's defense boost lasts for three turns instead of one (ensuring that it is virtually permanent).
Upon defeat, he tries to escape with his "treasure", one of his action figures, only to comically slip, fall, and break it. With his spirits broken, he dramatically accepts death at the "Titans'" hands. Aegiomon however, manages to calm him down by letting him know figures like that one are sold in Akihabara in the human world, spiking his interest towards it. Inori adding they're from the human world finally makes Vulcanusmon realize they are not Titans. After apologising, Vulcanusmon asks the party how things are outside. Afterwards, Inori explains they want Vulcanusmon to restore power to the Digital World to reactivate the railroad and get to Junomon, which Vulcanusmon proceeds to do before saying goodbye to the party, alongside his interest in going to the Real World someday. Vulcanusmon will craft Digimentals, Legendary Spirits, Elemental Guards and other powerful equipment for the protagonist afterwards.
Some time after the Digimon Invasion in the human world, 8 years ago, Vulcanusmon went there. However, he was captured by D-SAT and was used for experimentation. In a usual timeline, D-SAT will extract his crafting knowledge to create anti-Digimon weapons such as the Giant Slayer, finally extracting DigiCore as fuel for the machine, killing him. His death was a part of Chronomon's design so Aegiomon will always collide with the Giant Slayer and end the world unless the timeline is fixed. As a result, in the present day, a [[Guardromon (Gold) standing near the entrance of the Factorial Area will provide the same crafting services as Vulcanusmon's Workshop.
The Agent however, travels back in time to stop his death by breaking him out of the D-SAT laboratory. After joining the party as a level 60 Digimon with Appropriate Works, Pinpoint Weapon Works and the Wolkenapalm III and Full Metal Pile III Attachment Skills, they then escort him back to Rebellion Village, defeating Dr. Kuga Toya in a Power Loader machine on the way. Afterwards, Monica Simmons asks him for forgiveness as not all the human race hates Digimon and Vulcanusmon jokingly demands her to buy five action figures from Akihabara for his forgiveness.
While Vulcanusmon is an Apostle of Iliad and thus must be saved to prevent the Shinjuku Inferno from destroying the world, saving him does not prevent the Giant Slayer from being activated, as Chronomon can activate it by simply possessing the machine.
After the Host Computers give the Agent the ability to time jump to whatever period and place they want to go to, Vulcanusmon asks for their help in the side mission "Longing for Akihabara" in the Factorial Town 8 years ago. There, he shows the Agent a very realistic action figure hand he found. He wanted a figure from the same series which he thought could be obtained in Akihabara. As such, he sent the Agent to get it, alongside the hand part and a receipt. Thanks to Dr. Simmons, the Agent got the Fully Posable Sayuri figure for Vulcanusmon, which made him very happy. Clearing this quest rewards the Agent with Fragment Memory: Vulcanusmon, which can be used to craft his item in his workshop.
When the Olympos XII was officially formed, Vulcanusmon was present in the gathering.
After going through one of her gates in "The Final Battle over the Natural Order", the Agent's party found Junomon alongside Vulcanusmon in Akashic Oblivion. There, Vulcanusmon explained Junomon had created a gate that would lead them to Chronomon so they used all their available technology to build a special bridge to get to it safely. However, before they could complete it, valuable batteries were stolen by some Tsumemon. Because the bridge was invisible thanks to its stealth technology, they couldn't get through it to get to the Tsumemon, so they sent the Agent to do it instead. After the Agent recovered the Special Battery, Vulcanusmon, Kokuwamon A and Kokuwamon B completed the bridge, but then a copy of Lucemon: Satan Mode of the Seven Great Demon Lords appeared. Junomon knew it was an assassin sent by the Akashic Records and believed they could beat a mere fascimile if they worked together. During the fight, Vulcanusmon can use Saint Knuckle III, Appropriate Works and Pinpoint Weapon Works.
After the fight, Junomon and Vulcanusmon decided to stay behind to defend the gate.
The Apostles of Iliad later united on Ceresmon's back. There, Vulcanusmon pointed out he had heard even the humans in the Real World were putting up resistance. He wanted to keep talking to Dr. Simmons and receive his promised action figures so he couldn't allow the world to end yet.
During the fight against Chronomon, after he went back in time and dealt a massive blow to the Agent's party, Mercurymon, Neptunemon and Venusmon with Kontontaru Zetsubō, the wounded trio left, replaced by Bacchusmon, Marsmon and Vulcanusmon. Bacchusmon promised to throw the greatest party ever after they won, Vulcanusmon was glad he'd be free to test all the prototypes he had built, and Marsmon was ready to test everything he had learned from Callismon. After leaving though, Mercurymon entrusted the Agent with the power they had left, greatly increasing their CP. During this fight, Vulcanusmon can use Wolkenapalm III, Crush Blade III, and Appropiate Works.
Chronomon repeated the same time warp/Kontontaru Zetsubō again, forcing this trio to retreat as well, this time replaced with Plutomon and Junomon. Just like before, Vulcanusmon gave the Agent the power they had left, once again greatly increasing their CP.
After lowering Chronomon's HP to 0, Mervamon entrusted the Agent with her power. Now having the power of all the Apostles of Iliad and Plutomon, the Agent was able to use it in a X-Arts that released copies of all of them from the Digivice, who then combined their power. The Agent and Aegiomon fused together into Jupitermon once more and absorbed said power, then threw it in Jupitermon's hammer to Chronomon, finally deleting it.
After the fight, Ceresmon brought the Apostles of Iliad back to the proper Iliad. Jupitermon then swore to protect the world alongside them and gave them the name Olympos XII.
Crafting[edit]
If the player returns to Vulcanusmon's room after defeating him as the boss of "Incoming Conflict", he will offer to craft various evolution items and equipment in exchange for Yen and certain materials. Advanced items require rare materials such as Immortal Eggs (only given in finite amounts in sidequests and from extremely rare Digitamamon surprise encounters), Fragment Memories, items that cannot be obtained during certain phases of the game or items that are only given out once or twice per playthrough. Items that require a certain Area Guardian's Fragment Memories will not appear on the available items tab unless the player has cleared the missions that reward it.
Because the Guardian Goddess' Greatsword and Queen Goddess' Love Chain requires a Stats Wall that is only given by Yggdrasil once after clearing the "Royal Knights, Assemble!" sidequest, it takes at least two playthroughs to purchase all of the items.
In the present day version of Factorial Area, a Guardromon (Gold) standing next to the right Kokuwamon statue at the entrance will offer to craft items in Vulcanusmon's place.
| Digimentals and Legendary Spirits (10,000 Yen each in addition to required materials) | ||||||
| Item | Materials required | Effect | ||||
|---|---|---|---|---|---|---|
| Digimental of Courage | Liquid Animation Data x1 Volcanapalm I x1 |
Evolves V-mon into Fladramon | ||||
| Digimental of Friendship | Black Texture x1 Nanomachine Break I x1 |
Evolves V-mon into Raidramon | ||||
| Digimental of Love | Spherical Model x1 Wind Claw I x1 |
Evolves Hawkmon into Holsmon | ||||
| Digimental of Purity | Wood Model x1 Iron Slash I x1 |
Evolves Hawkmon into Shurimon | ||||
| Digimental of Knowledge | Gravel Dataset x1 Iron Slash I x1 |
Evolves Armadimon into Digmon | ||||
| Digimental of Sincerity | Crystaline Model x1 Tidal Stream I x1 |
Evolves Armadimon into Submarimon | ||||
| Digimental of Hope | Brown Texture x1 Holy Light I x1 |
Evolves Patamon into Pegasmon | ||||
| Digimental of Light | Rusty Iron Texture x1 Comet Hammer I x1 |
Evolves Tailmon into Nefertimon | ||||
| Digimental of Miracles | Immortal Egg x1 Digi-Jewel x3 |
Evolves V-mon into Magnamon | ||||
| Digimental of Fate | Immortal Egg x1 Safety Guard x1 |
Evolves Terriermon into Rapidmon Armor | ||||
| Human Spirit of Fire | BBQ Skewer Set x4 Volcanapalm I x1 |
Evolves Coronamon into Agnimon | ||||
| Beast Spirit of Fire | Digimeat x5 Ignition Flare I x1 |
Allows Agnimon to Mode Change into Vritramon | ||||
| Human Spirit of Light | Fruit Tart x3 Saint Knuckle I x1 |
Evolves Kudamon into Wolfmon | ||||
| Beast Spirit of Light | Digiapple x5 Crush Blade I x1 |
Allows Wolfmon to Mode Change into Garmmon | ||||
| Elemental Guards (100,000 Yen each in addition to required materials) | ||||||
| Item | Materials required | Effect | ||||
| Flare Guard | Volcanapalm III x1 Ignition Flare III x1 Immortal Egg x1 |
Reduces Fire damage taken by 50% | ||||
| Aqua Guard | Aqua Pressure III x1 Hydro Water III x1 Immortal Egg x1 |
Reduces Water damage taken by 50% | ||||
| Plant Guard | Crescent Leaf III x1 Thorn Strike III x1 Immortal Egg x1 |
Reduces Plant damage taken by 50% | ||||
| Ice Guard | Icicle Edge III x1 Frozen Bullet III x1 Immortal Egg x1 |
Reduces Ice damage taken by 50% | ||||
| Elec Guard | Nanomachine Break III x1 Shock Plasma III x1 Immortal Egg x1 |
Reduces Electric damage taken by 50% | ||||
| Gaia Guard | Comet Hammer III x1 Stone Cleave III x1 Immortal Egg x1 |
Reduces Earth damage taken by 50% | ||||
| Steel Guard | Crush Blade III x1 Thruster Metal III x1 Immortal Egg x1 |
Reduces Steel damage taken by 50% | ||||
| Wind Guard | Wind Claw III x1 Sonic Shot III x1 Immortal Egg x1 |
Reduces Wind damage taken by 50% | ||||
| Light Guard | Saint Knuckle III x1 Holy Light III x1 Immortal Egg x1 |
Reduces Light damage taken by 50% | ||||
| Dark Guard | Shadow Fang III x1 Nightmare III x1 Immortal Egg x1 |
Reduces Dark damage taken by 50% | ||||
| Noise Guard | Heavy Strike III x1 Power Energy III x1 Immortal Egg x1 |
Reduces Noise damage taken by 50% | ||||
| Union Guards (200,000 Yen each in addition to required materials) | ||||||
| Item | Materials required | Effect | ||||
| Union Guard FP | Flare Guard x1 Plant Guard x1 |
Reduces Fire and Plant damage taken by 50% | ||||
| Union Guard AI | Aqua Guard x1 Ice Guard x1 |
Reduces Water and Ice damage taken by 50% | ||||
| Union Guard EW | Elec Guard x1 Wind Guard x1 |
Reduces Electric and Wind damage taken by 50% | ||||
| Union Guard GS | Gaia Guard x1 Steel Guard x1 |
Reduces Earth and Steel damage taken by 50% | ||||
| Union Guard LD | Light Guard x1 Dark Guard x1 |
Reduces Light and Dark damage taken by 50% | ||||
| Premium equipment (200,000 Yen each in addition to required materials) | ||||||
| Item | Materials required | Effect | ||||
| Speed God's Boots | Fragment Memory: Mercurymon x1 SPD Attach III x1 Poison Wall I x1 Poison Wall II x1 Immortal Egg x1 |
| ||||
| Smithing God's Hammer | Fragment Memory: Vulcanusmon x1 CRT Attach II x1 Panic Wall I x1 Panic Wall II x1 Immortal Egg x1 |
| ||||
| Sea God's Red Scarf | Fragment Memory: Neptunemon x1 ATK Attach III x1 Paralyze Wall I x1 Paralyze Wall II x1 Immortal Egg x1 |
| ||||
| Goddess of Love's Shell | Fragment Memory: Venusmon x1 HP Attach III x1 Panic Wall I x1 Panic Wall II x1 Immortal Egg x1 |
| ||||
| God of Wine's Barrel | Fragment Memory: Bacchusmon x1 AGL Attach II x1 Dot Wall I x1 Barrel x1 Immortal Egg x1 |
| ||||
| God of Fertility's Sapling | Fragment Memory: Ceresmon x1 DEF Attach III x1 Poison Wall I x1 Poison Wall II x1 Immortal Egg x1 |
| ||||
| God of War's Gauntlets | Fragment Memory: Marsmon x1 HIT Attach II x1 Death Wall x1 Saint Knuckle III x1 Immortal Egg x1 |
| ||||
| Queen Goddess' Love Chain | Fragment Memory: Junomon x1 INT Attach III x1 Stats Wall x1 Iron Texture x5 Immortal Egg x1 |
| ||||
| Underworld God's Cloak | Fragment Memory: Plutomon x1 MND Attach III x1 Death Wall x1 Black Texture x5 Immortal Egg x1 |
| ||||
| Sun God's Flaming Arrow | Fragment Memory: Apollomon x1 ATK Attach III x1 Paralyze Wall I x1 Paralyze Wall II x1 Immortal Egg x1 |
| ||||
| Moon God's Moonlight Bow | Fragment Memory: Dianamon x1 SP Attach III x1 Sleep Wall I x1 Sleep Wall II x1 Immortal Egg x1 |
| ||||
| Guardian Goddess' Greatsword | Fragment Memory: Minervamon x1 HP Attach III x1 Stats Wall x1 Mineral Texture x5 Immortal Egg x1 |
| ||||
| Sky God's Thunderbolt | Fragment Memory: Jupitermon x1 CRT Attach II x1 Dot Wall x1 Generator x1 Immortal Egg x1 |
| ||||
TCG[edit]
| Digimon Card Game | |
| |
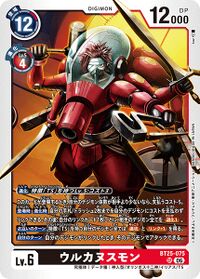

Vulcanusmon is featured on BT25-101 Divine Arms Version Ω, representing the Divine Arms Version Ω used by Vulcanusmon in its first battle against the player in Digimon Story: Time Stranger.
Image Gallery[edit]
Artwork[edit]
|
|
| Time Stranger (Vulcanusmon) |
Additional Information[edit]
| References | Notes |
|
|
|

